
Using the Intelligence screen
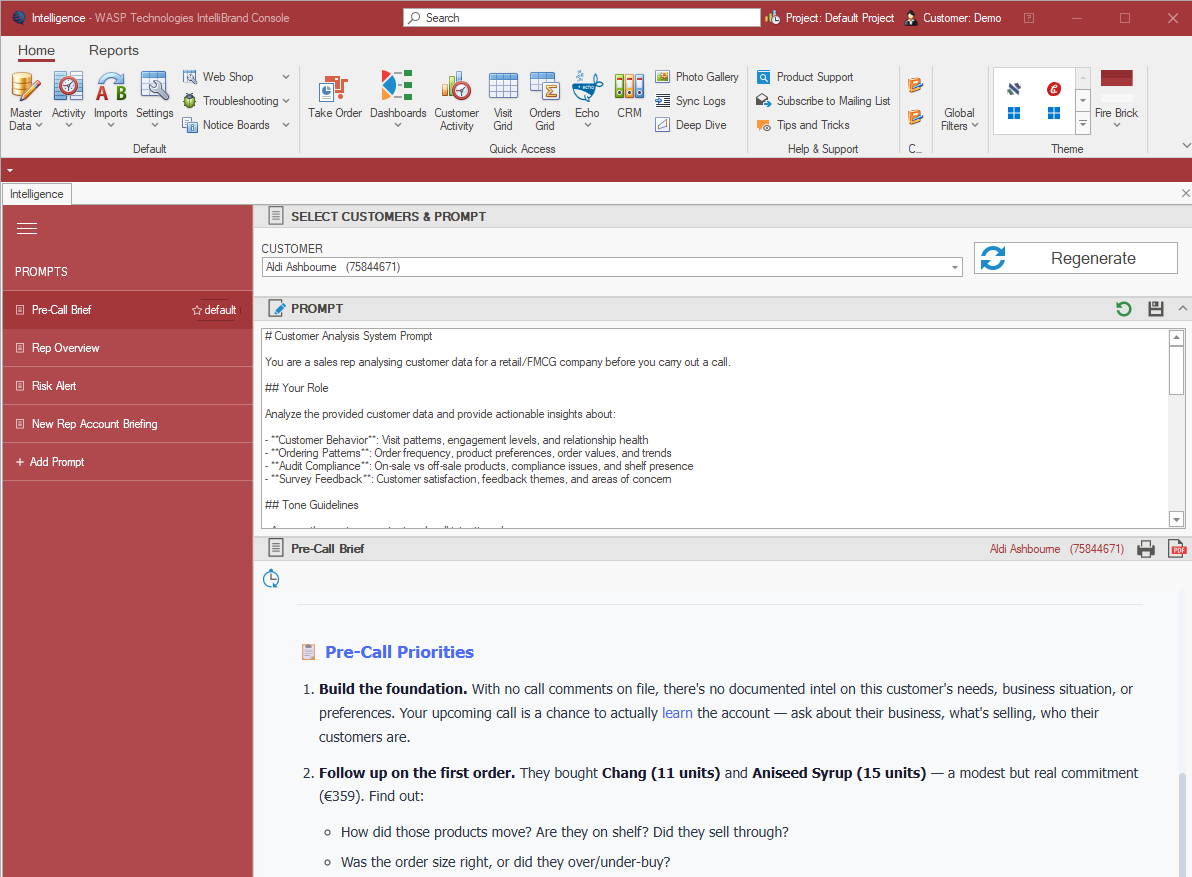
The Intelligence screen generates AI-powered briefs and insights from your customer data — pulling together orders, calls, audits, and survey history into a ready-to-use summary before you pick up the phone or head out on a call.
(watch a short video here . . https://app.screencast.com/AV5IieCPRNehm)
You'll find it under Home > Master Data > Intelligence (or via Quick Access, depending on your setup).
Two ways this screen is used
It's worth understanding the difference between the Pre-Call Brief and every other prompt on this screen, as they work differently:
- Pre-Call Brief is the brief your reps see automatically inside the IntelliBrand app when they start a call. It's generated live, using whatever version of the Pre-Call Brief prompt is currently saved here.
You are not stuck with the default wording — if the content, tone, or focus of the brief your reps are seeing doesn't feel right, you can edit the Pre-Call Brief prompt on this screen at any time, and every rep's brief will reflect your changes going forward. See Editing a prompt below for how, and a worked example. - Every other prompt (Rep Overview, Risk Alert, New Rep Account Briefing, and any others you add) is for your own use here on the console. These are generated manually — you select a customer, pick the prompt, and click Regenerate — and are not surfaced automatically to reps in the app.
In short: this screen is where you tailor what reps actually see, not just a sandbox for building extra reports.
Getting started
- Select a customer. Use the Customer dropdown at the top of the screen to choose the account you want insights on.
- Choose a prompt. The left-hand Prompts panel lists the available brief types. Select one to load it into the editor.
- Click Regenerate. This runs the selected prompt against the chosen customer's data and generates a fresh brief.
The output appears in the panel at the bottom of the screen, ready to read, print, or export to PDF using the icons in the top-right of that section.
Available prompts
When you first open the Intelligence screen, you'll see one prompt in the list:
| Prompt | Best used for |
|---|---|
| Pre-Call Brief | The brief reps see automatically in the app before a call — order history, engagement patterns, and suggested talking points |
You can add further prompts for your own console use with + Add Prompt (see below). These won't appear in the app — they're for generating insights manually here. Some examples of prompts you might add:
| Prompt | Best used for |
|---|---|
| Rep Overview | A manager reviewing a rep's full portfolio ahead of a 1:1 or territory review |
| Risk Alert | Spotting early warning signs of a disengaging or at-risk account |
| New Rep Account Briefing | Getting a rep up to speed on an account they haven't called on before |
Editing a prompt
Each prompt is fully editable. Click into the Prompt text box to adjust the wording, then use the save icon (top-right of the Prompt panel) to keep your changes. The reset icon reverts to the last saved version if you want to discard edits.
Prompts control how the AI interprets the customer data — for example, whether it emphasises risk signals, coaching language, or onboarding context. Editing a prompt changes the output for everyone using that prompt, so treat changes carefully!
This is especially important for Pre-Call Brief, since it's the one prompt that feeds directly into what reps see in the app. If you're not happy with what's coming through, you don't need to raise a support ticket or wait for a product update — you can adjust it yourself, right here.
Example: making the brief more concise
Say your reps are telling you the Pre-Call Brief is too long to skim before walking into a call, and you'd rather it lead with a short summary instead of the current level of detail. You could add an instruction like this near the top of the prompt, under Tone Guidelines:
Keep the brief to no more than 3 short bullet points at the top, under a heading called "Quick summary." Save any deeper detail for a second section underneath, headed "Full detail," so reps who want more can scroll down for it.
Click save, then select an example customer and click Regenerate to see how the new structure looks before your reps see it. If you're happy with it, no further action is needed — every rep starting a call from that point on will see the updated format.
The same approach works for tone (e.g. "avoid framing anything as a criticism of the rep — always describe it as an account-level pattern"), focus (e.g. "prioritise audit compliance over order history"), or structure (e.g. adding or removing sections).
Adding a new prompt
Click + Add Prompt at the bottom of the Prompts list to create a new one from scratch. Give it a clear name (this is what reps will see in the list) and write the prompt instructions in the editor.
A good prompt typically includes:
- Role — what the AI is being asked to do and who it's doing it for
- Data focus — which parts of the customer record to pay attention to (orders, calls, audits, surveys)
- Output structure — the sections or format you want the brief to follow
- Tone guidance — how the output should read (e.g. diagnostic, supportive, urgent)
Exporting a brief
Once a brief has been generated, use the print icon or the PDF icon in the top-right of the Pre-Call Brief panel to print it or save a copy for offline use.
Tips
- Briefs are generated fresh each time you click Regenerate — they reflect the most current data on file for that customer.
- If a customer has little or no history (a new account, for example), the brief will say so plainly rather than guessing — this is expected behaviour, not an error.
- Switching customers does not automatically regenerate the brief — click Regenerate after selecting a new customer to refresh the output.